Thursday, January 22, 2026
The Brooding Services for 2026
As noted in the earlier post this month, we are starting our/your chick flocks the first week of March with the six-week pullets ready for pickup (local delivery available) in Mid April. We selected six hearty breeds known to be great for our region (Portland/Gresham) weather patterns.
Ourchicken.farm guarantee is as follows:
- healthy chicks sourced from a nearby NPIP certified hatchery.
- vaccinated against Marek’s Disease.
- female (pullet) swap out available in the event we accidentally include a rooster in your flock (in effect for 10 weeks of age).
- weekly photos of your flock growing for the first four weeks posted on our photo’s pages.
- choice of having your pullets fed Organic or non-medicated Non-organic top quality chick feed.
- raised on clean Organic hemp litter bedding.
- chicks are held daily for socialization and friendlier human interactions.
This year, we are also offering to brood a few chicks that you can purchase from a local resource, like Burns Feed Store, Geren’s Feed, Tractor Supply, or Coastal Farm. Our full guarantee, however, will not apply. We cannot assure health/survival during brooding, vaccination, or gender. Roosters from these resources cannot be returned to us nor refunded. Arrangements must be made at least the week prior to brooding starting (by February 23, 2026). There will be a $1/chick deposit for services required to confirm commitment/brooding space.
Six-week Brooding Service Charge for 2026
Non-Organic feed Kalmbach - $30/chick to be paid when birds are picked up.
Organic feed Nutrena - $40/chick to be paid when birds are picked up.
Six-week old pullets should never be placed with an existing older flock. They will need integration time for their safety. Once the pullets leave our farm, we can no longer guarantee their safety, health or well-being. Ensure that you have a secure and safe environment for them as they develop into mature hens.
* Pullets that are not picked up at six weeks can be held over for you for a few extra weeks (up to four extra weeks) for an additional cost for feed and handling.
Brooding service price discounts available for flocks of at least four chicks. Ask for details.
Chick reservation from our NPIP resource with our guarantee must be made/paid in advance. We have approximately 30 chicks available this year to reserve. Reservation cost per chick will depend upon the breeds selected. Varies from $6.50 to $10.50 based on breed. Basically, you are reimbursing us for the amount we paid to the hatchery.
Questions or want more details? Email us at 2026chicks[~at~]2-email.me
Saturday, January 3, 2026
Spring 2026 Chick Breeds Decided
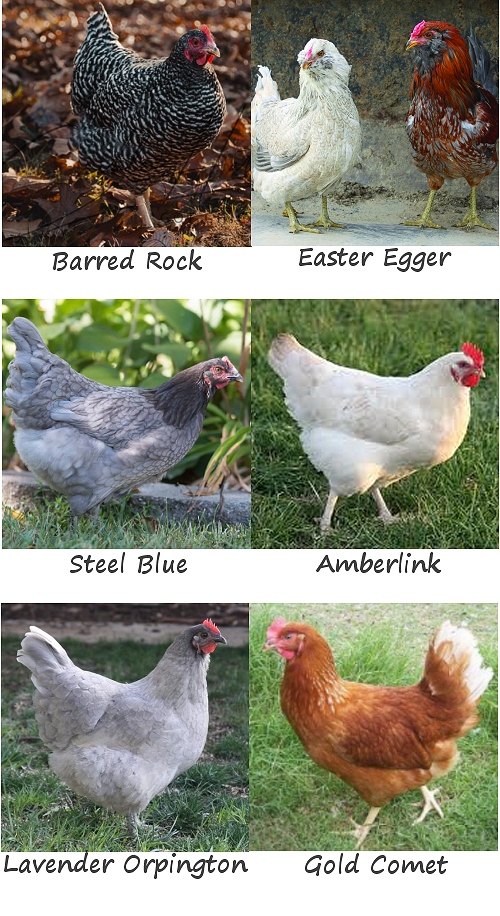
I ended up selecting some of my favorite breeds and one new breed for this year’s brood. Six breeds in all. Barred Rock, Gold Comet, Easter Eggers, Steel Blue Novagen, Lavender Orpington, and Amberlink. All are considered great breeds for our region. The chicks will arrive the first week of March, 2026. You can reach out to us on our facebook page or email 2026chicks[~at~]2-email.me for the quickest response.
Monday, September 29, 2025
Still Deciding on Breeds for 2026
We are likely to have fewer breeds available for sale in February 2026. There is a reason for this. A huge reason has to do with the US Postal Service. This past year, USPS stopped doing expedient delivery of livestock.
In the past, I have ordered my chicks from a specific MidWestern Hatchery that is a NPIP Certified No Kill hatchery. The timeliness of delivery prior to 2025 has always been two days with an occasional three day delivery time from hatch to arrival. This year, it was a four day delivery. Sixty percent survival is not terrible, but was heart breaking. In the past, I would only lose one or possibly two chicks in shipment. This year was really rough, in that not only were there a lot of dead chicks, there was a residual die off over that first week of ones that simply could not bounce back and thrive. We also noted that the survivors were slower to develop and mature this year.
That being stated, there are only a few hatcheries closer to us I will consider using. I only want chicks that can be vaccinated right after hatching, and I only want chicks from NPIP certified hatcheries. The chicks will be costing me more this year, but I will do my best to keep prices the same by changing up my feed. I probably won’t use organic start and grow, but find quality non-organic, non-medicated chick feed as a less expensive alternative.
The hatcheries that are closer to us typically do not offer as many breed options. I’ll always try to have the standard Barred Rock, Rhode Island Red, and Easter Egger. As for other breeds, we will just need to wait to see what the hatcheries will have in their lineup.
As an alternative, we can always check to see what breeds are available from Burns Feed Store next year in February. The only drawback is that those chicks will not be vaccinated for Marek’s, which can only happen during the first 24 hours after hatching in order to be effective.
Let’s keep our fingers crossed for a better outcome for 2026.
Fall Season Light Reduction and Egg Production
Well, Fall Season is upon us, and that means we are getting about 11 to 12 hours of light per day. That amount of daylight will continue to dwindle over the next few month. When Winter arrives, our area will be down to about eight and one half hours of daylight. If your chickens are still laying well, that’s a lucky break for you. But, you may notice that as there is less daylight, some or all of your hens will start to lay less frequently, or stop all together. This is not because of anything you are doing wrong. This is just that the chickens are not receiving enough light to stimulate their hormones for egg laying purposes. Do not assume that it has anything to do with what you are feeding them, or not feeding them. Some breeds (usually some cross breeds) will continue to lay regardless, even with eight or nine hours of daylight.
At some point in the fall, some people add lights inside their coops to stimulate the chickens’ desire to lay. If you do add lights, don’t overdo by adding too much light (too bright) or too long. Be sure to allow for at least eight hours of night time resting so that the chickens do not become stressed. Just remember to do this safely so as not to create a fire hazard. There are plenty of articles on the internet that discuss this process in more detail.
If you want to know what I do? Well, it depends, from one year to the next. If we start getting too many dark “days” in October, I will add a light, on a timer, that clicks on about an hour before dawn, and clicks off shortly before dusk. As the days continue to get shorter, I will adjust the time to have the light click on earlier in the morning, gradually adjusting for a 12 to 14 hour day of artificial lighting. I watch for stress levels of the birds, and adjust accordingly. Sometimes, it really is not worth stressing out your hens.
If, at least half of my hens are laying as we approach winter, I may not add light at all. Typically, by February, the hens that were not laying between November and January, will start to kick back into production, and by March, most of my hens will be laying eggs again, without additional lighting.
There is no hard and fast rule on this. Hens that “take a break” are probably needing the rest. That is OK too.
Wednesday, April 16, 2025
Coop/House Training Pullets
Sometimes (frequently) pullets are totally confused when it comes to “sleeping” inside their new house, outdoors. There are a couple of reasons for this, and the first reason is the fact that they have slept for almost two months, inside a brooder, with no concept of being outside, yet. Another reason is the fact that the coop/house does not “smell” right. In other words, their “stink” isn’t in there yet. Yes, hens like the familiar smell of themselves for safety reasons.
While, we want them to be doing their chicken things outside, during the day, we want them to “go to bed” at night safely tucked into their coop/house. Yet, they don’t know this routine yet. It takes them a while to figure out that they can sleep inside the coop, up on a perch, for their own safety. It can take weeks to train them to “go inside” when it is dusk.
One of the easiest methods of training involves locking them inside the coop/house for a few days… two or three days, up to a week, with fresh food and water provided daily, inside their coop/housing. After they have been confined to their house for a few days, then, let them out into the run/pen, providing the food and water outside for them during the day and take away their food in the evenings so that you don’t invite extra nocturnal guests to your chicken run.
Now, this is not a guarantee that they will roost inside that first evening, but the chances are increased greatly, that they will. Usually, there is a bossy one that will try to round them all up to go into the coop as the evening gets darker. As darkness falls, if only a few are inside, then gently pick up the stragglers from where ever they have decided they want to sleep, and place them inside the coop through the opening that you want them to enter/exit. Close it up for the night so that they have no option but to stay in all night. Let them out first thing in the morning, at dawn (preferably). Typically, within the next week, they should have the night time routine of sleeping in the coop/house mostly figured out.
Also, and this is important, close off the nesting boxes to the pullets. If they start thinking that they can “sleep” inside the nesting boxes, before they are ready to start laying their eggs, there is going to be some messy issues later on, when they do start to lay, but will also want to sleep in their nesting boxes, where they will leave a smelly deposit that will soil their eggs. So, don’t open up the nesting boxes until the pullets are about 16 to 18 weeks. Then, you can place some fake eggs inside the nesting boxes to encourage them to start laying eggs.